What is IPMI? Why still use a serial console?
While your desktop or laptop at home isn’t all that far away from you, a server in a remote datacenter isn’t usually within reach. In case of issues with the machine or its operating system, it might be handy to have access to its keyboard and mouse inputs and video output to diagnose boot errors, kernel panics and all that sort of thing. On decent servers, a Baseboard Management Controller (BMC) exists, which speaks the IPMI protocol. This allows you to reboot a machine, power it up or down, read out some sensor data, etc. On modern servers, this function is supplemented by a web server which can also serve you the same data through your browser, which makes things a little more accessible. Even better if there’s a way to reach the KVM (Keyboard, Video, Mouse) from there.
This isn’t always the case however. On HP servers, to access this after the OS has booted requires an “iLO Advanced License” which may not be in your budget, or simply not activated on that one older server you’re still using. Older servers, like ones based on Supermicro’s IPMI 2.0 add-in boards simply don’t have this function. Or you may have a BMC which uses a Java applet to show you the KVM, which no longer works with a recent Java version, or even worse, it’s an ActiveX object that only works in IE6!
Have no fear, there’s another nice function that IPMI v2.0 provides: Serial-over-LAN. For a Windows server, that likely doesn’t mean much, but for a Linux server, we can definitely make use of this. I’ll be using Debian in this article, but the same will go for Ubuntu (likely with identical commands and files) and any other Linux distribution (which may use different paths, commands, etc).
After setting this up for one of my home test servers that’s usually powered off, I’ve used it many times to watch its boot process remotely – It’s got 5 RAID controllers installed, so booting takes a while.
Prerequisites
For this set-up I will assume you have configured your IPMI card to be remotely accessible (IP address, gateway, etc), with a user configured. You can try this out fairly easily from a remote machine:
debian:~# ipmitool -H <ip address> -U <username> chassis status
Password:
System Power         : on
Power Overload       : false
(...)
This example is based on Debian “Jessie” 8.0 running on a Supermicro AOC-IPMI20-E (“BMC2”) on a X6DH8 board. It’s old, but set up should be fairly identical on newer machines. This BMC does not have remote KVM access at all, so Serial-over-LAN is the only way to get any access to the OS through the management controller.
On my old (2006!) Supermicro card, I had to upgrade the firmware from “IPMI 2.0 RCMP” to “IMPI 2.0 RCMP+” for Serial-over-LAN to work. This is because that feature was formally introduced in RCMP+ – some BMCs (Tyan, Intel, Supermicro) had custom extensions so some of their IPMI 1.5 controllers could already do it.
Try to connect to the IPMI serial port (using the “LAN Plus” interface, which means IPMI 2.0, as the default “LAN” interface is IPMI 1.5):
debian:~# ipmitool -H <ip address> -U <username> -I lanplus sol activate
Password:
[SOL Session operational.  Use ~? for help]
Unless you already have something configured to speak serial, things will just stay blank there. Exiting that SOL session can be done by typing “~.” like typing “~?” will tell you.
You can find the correct bit rate using the sol info command:
debian:~# ipmitool -H <ip address> -U <username> -I lanplus sol info 1
(...)
Volatile Bit Rate (kbps) : 19.2
Non-Volatile Bit Rate (kbps) : 19.2
(...)
On my old card I can’t seem to change the serial speed; if you can, I do recommend setting it to 115200bps as it’ll very much speed up your boot process. You can try doing this using ipmitool sol set volatile-bit-rate 115.2. If you succeed at changing this, be sure to replace 19200 by the bitrate you’re using in all commands and settings used below.
I used “screen /dev/ttySx 19200” on the server to find the correct serial port that is connected to the BMC – in my case (I think on all Supermicro boards) this was /dev/ttyS1 aka COM2. Just type something into the screen session, and if you see it appear on your remote IPMI Serial-over-LAN, you found the correct port.
Sending your BIOS output to the serial port
This is very likely Supermicro-specific, but setup for your board should be very similar. As we’ve established COM2 was the correct serial port, we enable Remote Access to the BIOS over COM2 (“COM B” in Supermicro BIOS), using 19200 8n1 serial settings.
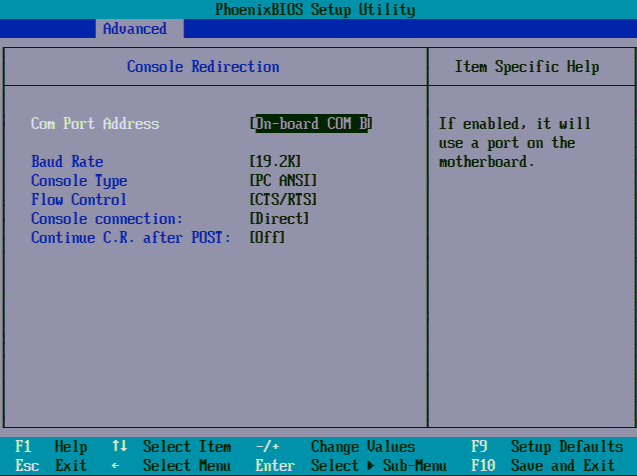
Make sure to disable “Enable Console Redirection after POST” in the BIOS setup not to conflict with GRUB’s serial terminal code.
Using this setup, you can even control your RAID controller BIOSes or similar. Of course, if this controller has a graphical interface (like LSI/Intel has), that won’t pass over the serial link. Boo!
You can even do a PXE boot, but once the PXE image has booted, it’ll have to do its own serial port output (unless you enable “Enable Console Redirection after POST”).
Sending your GRUB2 output to the serial port
Open /etc/default/grub and change the following settings:
GRUB_TERMINAL="serial console"
GRUB_SERIAL_COMMAND="serial --speed=19200 --unit=1 --word=8 --parity=no --stop=1"
Important note: that “serial console” isn’t a text string to tell GRUB2 to use a serial console. They’re 2 distinct words; as contrary to GRUB 0.x, GRUB2 supports 2 simultaneous I/O terminals – “serial” for the serial port, “console” for the machine’s native monitor/keyboard console.
In GRUB_SERIAL_COMMAND, “--unit=1” means ttyS1 aka COM2.
After changing the configuration, be sure to run update-grub – but check the next section first, as there actually is some more work to do.
Sending your Linux kernel output to the serial port
Open /etc/default/grub and modify the GRUB_CMDLINE_LINUX_DEFAULT line:
GRUB_CMDLINE_LINUX_DEFAULT="console=tty0 console=ttyS1,19200n8"
I would recommend to remove “quiet” to get the full kernel output over your serial port – if you leave it, you won’t see a whole lot of output on your serial port at all.
After changing the configuration, be sure to run update-grub.
Enabling a serial console login on the serial port
Older HOWTOs likely point you at /etc/inittab – a file which is no longer used by systemd (which Debian 8 is using). The good news is, if you’ve enabled GRUB2 to use a serial port, systemd will automatically add a listener on that serial port.
Memtest86+
If you have the memtest86+ package installed, it will automatically add a few entries to your grub menu to run memtest with serial port support. However, if your IPMI SOL port speed is not 115200 and/or your serial port is not ttyS1/COM1, it might be useful to modify /etc/grub.d/20_memtest86. Replace 115200 by your correct bitrate and ttyS0 by the correct serial port. Make sure to run update-grub after editing this file.
Conclusion
If everything went well, you how have a fully serial-controllable system! From booting the BIOS, to the boot loader, over the Linux kernel out right to the terminal login prompt, everything is accessible to you via the IPMI serial console.